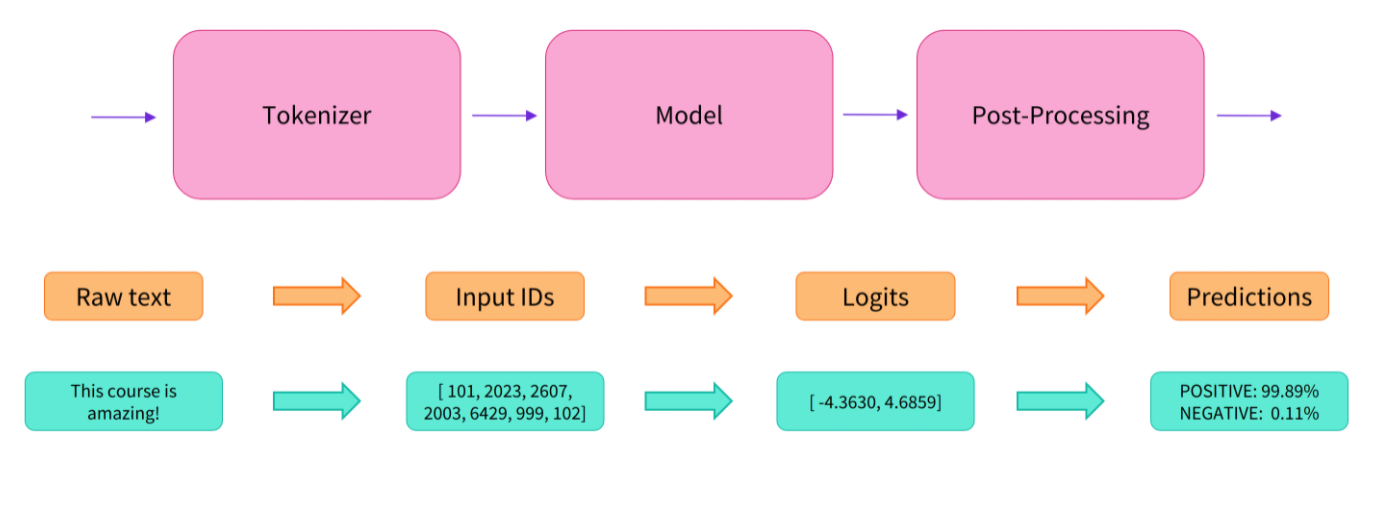
Hugging face: Behind the pipeline
Huggingface에 관한 포스트는 Huggingface 공식 홈페이지를 참고하여 작성하였으며 그 중에서도 Huggingface를 사용하는 방법에 관해 친절하게 설명해 놓은 글(Huggingface course)이 있어 이것을 바탕으로 작성하였습니다.
앞에서 봤던 pipeline API는 간단하고 나의 task에 바로 적용할 수 있지만, 모델을 나의 task에 알맞게 조금 더 수정하고 싶다면 내부를 들여다 볼 필요가 있습니다. 이번 포스트에서는 pipeline API 내부를 조금 더 자세히 알아보도록 하겠습니다.🤗
1. Introduction
Transformer 기반의 모델들은 크기가 굉장히 크고, 훈련, 배포가 쉽지 않습니다. 게다가 최근에는 Transformer기반의 새로운 모델들이 계속 나오고 있기 때문에, 그 때마다 모델을 훈련하는 방법을 익혀야 한다면 굉장히 힘들 것 입니다. 다행히 Huggingface는 이러한 점들을 염두해두고 Library를 개발했기 때문했습니다. 다음은 Huggingface에서 제공하는 Library들의 철학입니다.
- Ease of use: Downloading, loading, and using a state-of-the-art NLP model for inference can be done in just two lines of code.
- Flexibility: At their core, all models are simple PyTorch nn.Module or TensorFlow tf.keras.Model classes and can be handled like any other models in their respective machine learning (ML) frameworks.
- Simplicity: Hardly any abstractions are made across the library. The “All in one file” is a core concept: a model’s forward pass is entirely defined in a single file, so that the code itself is understandable and hackable.

2. Tokenizer
Like other neural networks, Transformer models can’t process raw text directly, so the first step of our pipeline is to convert the text inputs into numbers that the model can make sense of.
Tokenizing needs to be done in exactly the same way as when the model was pretrained, so we first need to download that information from the Model Hub. To do this, we use the AutoTokenizer class and its from_pretrained method. Using the checkpoint name of our model, it will automatically fetch the data associated with the model’s tokenizer and cache it
from transformers import AutoTokenizer

# 우리가 사용할 모델의 이름
checkpoint = "distilbert-base-uncased-finetuned-sst-2-english"

# checkpoint가 학습할 때 사용되었던 Tokenizer가 불러와진다(downloaded and cached)
tokenizer = AutoTokenizer.from_pretrained(checkpoint)
Once we have the tokenizer, we can directly pass our sentences to it and we’ll get back a dictionary that’s ready to feed to our model! The only thing left to do is to convert the list of input IDs to tensors.
raw_inputs = [
    "I've been waiting for a HuggingFace course my whole life.",
    "I hate this so much!",
]

# return_tensors -> if no type is passed, you will get a list of lists as a result
inputs = tokenizer(raw_inputs, padding=True, truncation=True, return_tensors="pt")
print(inputs)
----------------------------------------------------------------------------------------
{
    'input_ids': tensor([
        [  101,  1045,  1005,  2310,  2042,  3403,  2005,  1037, 17662, 12172, 2607,  2026,  2878,  2166,  1012,   102],
        [  101,  1045,  5223,  2023,  2061,  2172,   999,   102,     0,     0,     0,     0,     0,     0,     0,     0]
    ]),
    'attention_mask': tensor([
        [1, 1, 1, 1, 1, 1, 1, 1, 1, 1, 1, 1, 1, 1, 1, 1],
        [1, 1, 1, 1, 1, 1, 1, 0, 0, 0, 0, 0, 0, 0, 0, 0]
    ])
}
3. Going through the model
We can download our pretrained model in the same way we did with our tokenizer. 🤗Transformers provides an AutoModel class which also has a from_pretrained method:
from transformers import AutoModel

checkpoint = "distilbert-base-uncased-finetuned-sst-2-english"
model = AutoModel.from_pretrained(checkpoint)
In this code snippet, we have downloaded the same checkpoint we used in our pipeline before (it should actually have been cached already) and instantiated a model with it.
outputs = model(**inputs)
print(outputs.last_hidden_state.shape)
---------------------------------------------
torch.Size([2, 16, 768])
Note that the outputs of 🤗Transformers models behave like namedtuples or dictionaries. You can access the elements by attributes (like we did) or by key (outputs[“last_hidden_state”]), or even by index if you know exactly where the thing you are looking for is (outputs[0]).
- outputs.last_hidden_state
- outputs[‘last_hidden_state’]
- outputs[0]
There are many different architectures available in 🤗Transformers, with each one designed around tackling a specific task. Here is a non-exhaustive list:
- *Model (retrieve the hidden states)
- *ForCausalLM
- *ForMaskedLM
- *ForMultipleChoice
- *ForQuestionAnswering
- *ForSequenceClassification
- *ForTokenClassification
- and others 🤗
For our example, we will need a model with a sequence classification head (to be able to classify the sentences as positive or negative). So, we won’t actually use the AutoModel class, but AutoModelForSequenceClassification:
from transformers import AutoModelForSequenceClassification

checkpoint = "distilbert-base-uncased-finetuned-sst-2-english"
model = AutoModelForSequenceClassification.from_pretrained(checkpoint)
outputs = model(**inputs)
# 여기는 위의 outputs.last_hidden_state가 아니라 outputs.logits이구만
print(outputs.logits.shape)
-----------------------------
torch.Size([2, 2])
4. Postprocessing the output
print(outputs.logits)
---------------------------------
tensor([[-1.5607,  1.6123],
        [ 4.1692, -3.3464]], grad_fn=<AddmmBackward>)
Those are not probabilities but logits, the raw, unnormalized scores outputted by the last layer of the model. To be converted to probabilities, they need to go through a SoftMax layer (all 🤗Transformers models output the logits, as the loss function for training will generally fuse the last activation function, such as SoftMax, with the actual loss function, such as cross entropy):
import torch

predictions = torch.nn.functional.softmax(outputs.logits, dim=-1)
print(predictions)
------------------------------------------------------------------
tensor([[4.0195e-02, 9.5980e-01],
        [9.9946e-01, 5.4418e-04]], grad_fn=<SoftmaxBackward>)
To get the labels corresponding to each position, we can inspect the id2label attribute of the model config (more on this in the next section):
model.config.id2label
---------------------------
{0: 'NEGATIVE', 1: 'POSITIVE'}
We have successfully reproduced the three steps of the pipeline: preprocessing with tokenizers, passing the inputs through the model, and postprocessing! Now let’s take some time to dive deeper into each of those steps.
